Anaplan
I have started looking at Anaplan. As I'm familiar with Hyperion Planning how the planning and budgeting works in Hyperion. Who ever wants to know how Anaplan works in place of Hyperion Planning in real time.
Below are the some of concepts of Anaplan I want to share with you all. It will be continued in further posts.
- What is Anaplan,
- Features of Anaplan, Structure of Anaplan,
- How to create a Model in Anaplan?
- How to insert a new version?
- How to create a list?
- How to create a module.What are Line items.

Fig
1:Anaplan Features
- Cloud Based: It allows users to access software applications which are shared In Memory.
- In Memory processing: To meet Business needs Anaplan maintains In Memory Database.
- App Hub: Common use cases are available in the hub to retrieve them whenever needed i.e. for future use.
- Data Integration: Import and Export of data is performed with different types of data sources.
- Multi-dimensional Planning: It can build any number of models irrespective of any level of granularity.
Anaplan Structure

Fig 2: Anaplan Structure
Workspace:All the models will be available respective to the company.
Model:Enables business
users to build multi-dimensional models.
- Models can be built to any level of granukarity with any number of dimensions
- A model is a collection of lists,modules and dashboard that are all used for a area of business planning .
- Login into your Anaplan account.
- In the upper right corner of the main screen, click the drop-down right of your name and now select the manage models. Below is the following screenshot.

- Click on Manage Models

- Click New

- In the new model dialog box, give the model name for example (MTSales). Next in the template drop down list ensure that it is empty model is selected
- Click create model. Once model is created model name will be displayed Upper left corner

Note: After creating a
model we need to set the Time for the model. Below is process how to set Time.
Time:
In
Anaplan, Time is one of the built-in Dimension Where you can structure the data
for the organization.

To set Time dimension properties in a model below are steps
- Select the calendar type
- Fiscal year start month we gave here is Jan
- Current Fiscal Year: How many years we want to have the model can be given according to the requirement
- Number of past and future years can be given.
- Current period we gave is mar19
- Ensure that how you want to see the data and click on the radio buttons as required, quarter totals and year to date summary are tick marked.
- Click on Apply
Versions:
Once model get created then two default versions i.e Actual and
forecast will be updated but according to the requirements. Also we can create new version members inserted or rename default members to required name.

- Switchover:It handles current period actuals, forecast & etc.
- We can write the formula as well for any Version.
How to insert a new version?

- When we want to insert a new version, click on the insert and in the dialogue box give the version name for example version1.
- Click ok.
List:
A List is a group of like
items
- Lists are important in Anaplan as they define structure and content of a model

- In the model settings tab ->general Lists

- Click on the organization, add the new items: example shown in the above screen shot (North, South, East, and West)
- Click on Ok.

- The above screen shot shows how the children looks in Organization after insterting them.
Modules:
These are the individual components
where user wants to enter the data.
How to Create a Module?

- In the model settings tab ->Click modules

- Dialogue box with empty module name

- For example, here we gave new module name Sales Analysis.
- Dimensions can be drag & drop in pages ,columns according to how you want to visualize the data.
- Click Ok
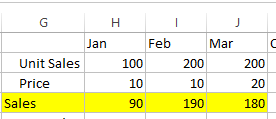
Line items:
Line items belong to the module which are in
rows.
- Example you can create line item1,line item2 by manually or you can copy and paste from the text file

- Values can be entered into the cells.
The information provided above is my understanding on the tool with less details. My Next post will explain other topics which are not covered here.
By:
Pranaya PanaugantiMouri Tech Pvt Ltd.